Configuring Firewall for port 8080 on Google Cloud and Installing Apache Tomcat 8

In case I forgot this once I want to setup another tomcat, thus I write it down. Setting up tomcat requires java to be ready on the instance, I did the java setup in this post. We know that tomcat is running on port :8080 (default), in order to make it accessible publicly, new firewall rules setup in VPC Network is required.

Setup Firewall Rules

Following the guideline from gcp documentation in this post,

  • Click on Go to the Firewall Page
  • This page will be shown, then click +CREATE FIREWALL RULE
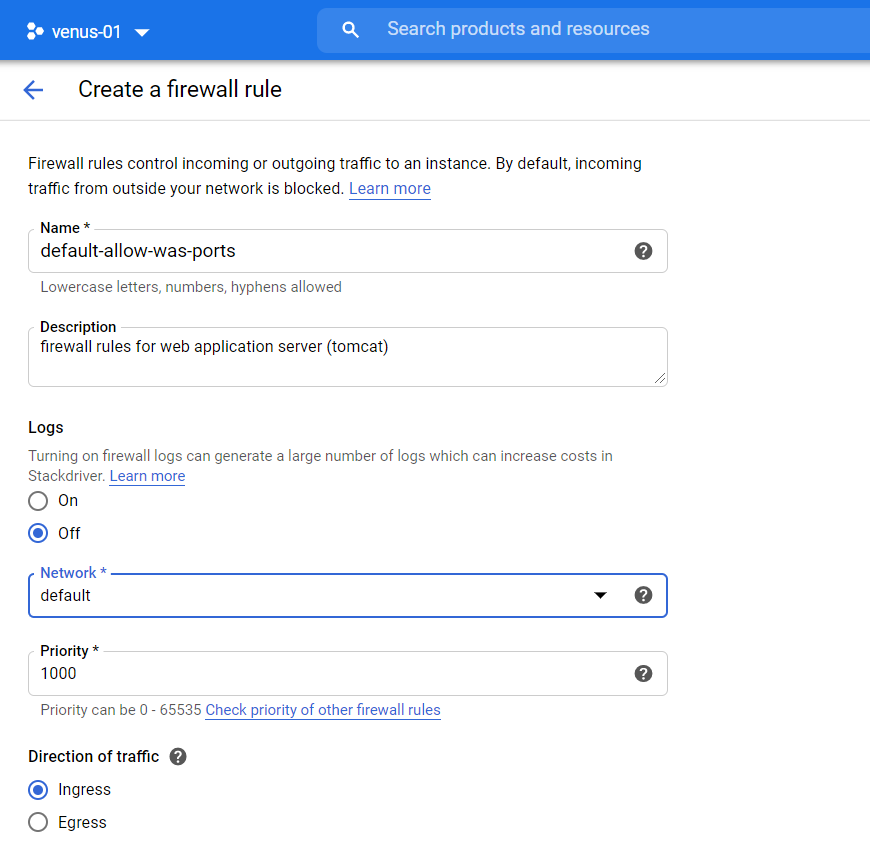
  • Enter the following Fields:
    • Name: name of the Firewall Rule. Name can be anything but it can have only lower case letters, hyphens and numbers
    • Priority: Priority of Rule. Higher the number lower the priority. I keep the default value(1000)
    • Direction of traffic: Ingress. Ingress applies to incoming traffic. Egress applies to outbound traffic.
    • Action on match: allow.
    • Targets: All instance in the network. Because if I plan to have more than one instance I want to make this available for all instance in the network.
    • Source filter: IP Ranges
    • Source IP Ranges: 0.0.0.0/0, means allow any IP, and anyone can send data

Once the firewall setup done, I continue to do the next one,

Installing Tomcat 8

After making sure firewall setup done, and having apache tomcat 8 package downloaded from its official download page, I copy the apache-tomcat-8.5.59.tar.gz to the home directory, then do these steps:

  • Extracting tar.gz
    • $ tar xvf apache-tomcat-8.5.59.tar.gz
  • Copy apache-tomcat-8.5.59 into nginx html and rename it as tomcat8 (if you want to put it in another directory the location can differ.
    • $ sudo mv apache-tomcat-8.5.59 /usr/share/nginx/html/tomcat8
  • Change the owner of tomcat8 directory
    • $ sudo chown -R myuser:myuser tomcat8
  • Edit java security, because in the first try, I can’t get the normal tomcat, and it is because the java security (getting this info from stackoverflow, thanks Bij)
    • go to java security directory, in my case, the directory is located here:
      $ cd /usr/java/jdk1.8.0_271-amd64/jre/lib/security
    • using vi edit java.security file
      $ sudo vi java.security
    • change securerandom.source=file:/dev/random to securerandom.source=file:/dev/./urandom
  • Run tomcat
    • $ cd /usr/share/nginx/html/tomcat8/bin
    • ./startup.sh
  • Check on the browser using PUBLIC_IP:8080

Reference:
1. google cloud computing official documentation
2. bytesofgigabytes web on setting up firewall in google cloud
3. bytesofgigabytes web on installing tomcat
4. stackoverflow answer posted by BiJ

Installing Oracle JDK 8 on Centos 7 (google cloud)

Installing jdk actually is quite simple, I use .rpm installer downloaded from Oracle JDK website.

Once the installer ready in my local, these are the steps:

  1. Upload .rpm installer into cloud using FTP client ( I uploaded the installer into my home directory)
  2. Login using ssh into cloud server
  3. Run the following command to install, verify the installation, and make sure that the installed version is the currently active java, and set the environment for all user respectively
    • sudo yum install <installer name>.rpm
    • java -version
    • sudo alternatives –config java , enter or choose the number of desired java
    • sudo sh -c “echo export JAVA_HOME=/usr/java/jdk1.8.0_161/jre >> /etc/environment”
    • source /etc/environment
[myuser@venus-instance-1 ~]$ sudo yum install jdk-8u271-linux-x64.rpm 
Loaded plugins: fastestmirror
Examining jdk-8u271-linux-x64.rpm: 2000:jdk1.8-1.8.0_271-fcs.x86_64
Marking jdk-8u271-linux-x64.rpm to be installed
Resolving Dependencies
--> Running transaction check
---> Package jdk1.8.x86_64 2000:1.8.0_271-fcs will be installed
--> Finished Dependency Resolution

Dependencies Resolved

================================================================================
 Package    Arch       Version                   Repository                Size
================================================================================
Installing:
 jdk1.8     x86_64     2000:1.8.0_271-fcs        /jdk-8u271-linux-x64     248 M

Transaction Summary
================================================================================
Install  1 Package

Total size: 248 M
Installed size: 248 M
Is this ok [y/d/N]: y
Downloading packages:
Running transaction check
Running transaction test
Transaction test succeeded
Running transaction
  Installing : 2000:jdk1.8-1.8.0_271-fcs.x86_64                             1/1 
Unpacking JAR files...
	tools.jar...
	plugin.jar...
	javaws.jar...
	deploy.jar...
	rt.jar...
	jsse.jar...
	charsets.jar...
	localedata.jar...
  Verifying  : 2000:jdk1.8-1.8.0_271-fcs.x86_64                             1/1 

Installed:
  jdk1.8.x86_64 2000:1.8.0_271-fcs                                              

Complete!
[myuser@venus-instance-1 ~]$ java -version
java version "1.8.0_271"
Java(TM) SE Runtime Environment (build 1.8.0_271-b09)
Java HotSpot(TM) 64-Bit Server VM (build 25.271-b09, mixed mode)
[myuser@venus-instance-1 ~]$ sudo alternatives --config java

There is 1 program that provides 'java'.

  Selection    Command
-----------------------------------------------
*+ 1           /usr/java/jdk1.8.0_271-amd64/bin/java

Enter to keep the current selection[+], or type selection number: 


PS: I took the simplest step to install oracle java 8, other tutorials can be found here, and here.