This is my frequent problem actually, after doing it so many times in win 7, now it’s time to do it on Windows 10 (finally my OS get upgraded). So let’s get started
Stopping mariaDB service by opening run(window + R) , and typing services.msc
On list, double click MariaDB. Once the detail window shows, make sure to check the installation path of MariaDB
Create a text file containing the password-assignment statement on a single line. Replace the password with the password that you want to use
SET PASSWORD FOR ‘root’@’localhost’ = PASSWORD(‘YourNewPassword!’); FLUSH PRIVILEGES;
Save the file. This example assumes that you name the file C:\mysql-init.txt.
Open console window as administrator by accessing start > type cmd > choose run as administrator
run mysqld with init configuration (mysql path can be seen on service properties on the previous step)
After in run, you may see the process listed in task manager. It alredy execute the query to reset the password, we can stop the service
Go to run > services.msc again, and start the service
Voila, you can login with the new password on your mariaDB client
In case I forgot this once I want to setup another tomcat, thus I write it down. Setting up tomcat requires java to be ready on the instance, I did the java setup in this post. We know that tomcat is running on port :8080 (default), in order to make it accessible publicly, new firewall rules setup in VPC Network is required.
Setup Firewall Rules
Following the guideline from gcp documentation in this post,
Click on Go to the Firewall Page
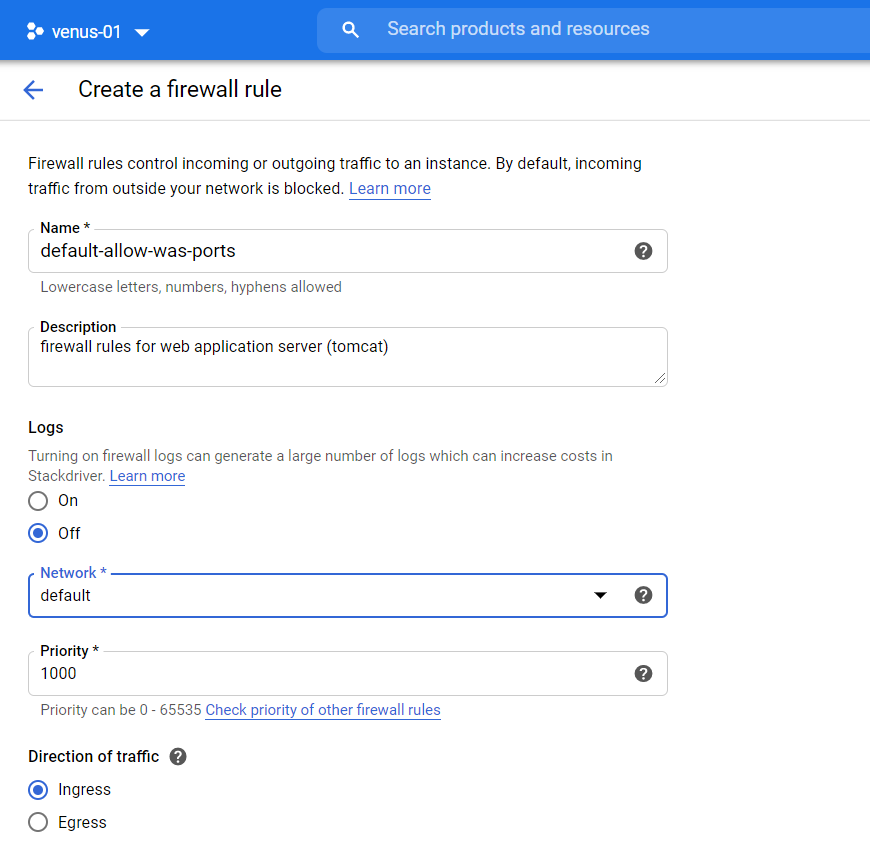
This page will be shown, then click +CREATE FIREWALL RULE
Enter the following Fields:
Name: name of the Firewall Rule. Name can be anything but it can have only lower case letters, hyphens and numbers
Priority: Priority of Rule. Higher the number lower the priority. I keep the default value(1000)
Direction of traffic: Ingress. Ingress applies to incoming traffic. Egress applies to outbound traffic.
Action on match: allow.
Targets: All instance in the network. Because if I plan to have more than one instance I want to make this available for all instance in the network.
Source filter: IP Ranges
Source IP Ranges: 0.0.0.0/0, means allow any IP, and anyone can send data
Once the firewall setup done, I continue to do the next one,
Installing Tomcat 8
After making sure firewall setup done, and having apache tomcat 8 package downloaded from its official download page, I copy the apache-tomcat-8.5.59.tar.gz to the home directory, then do these steps:
Extracting tar.gz
$ tar xvf apache-tomcat-8.5.59.tar.gz
Copy apache-tomcat-8.5.59 into nginx html and rename it as tomcat8 (if you want to put it in another directory the location can differ.
Edit java security, because in the first try, I can’t get the normal tomcat, and it is because the java security (getting this info from stackoverflow, thanks Bij)
go to java security directory, in my case, the directory is located here: $ cd /usr/java/jdk1.8.0_271-amd64/jre/lib/security
using vi edit java.security file $ sudo vi java.security
change securerandom.source=file:/dev/random to securerandom.source=file:/dev/./urandom
Installing jdk actually is quite simple, I use .rpm installer downloaded from Oracle JDK website.
Once the installer ready in my local, these are the steps:
Upload .rpm installer into cloud using FTP client ( I uploaded the installer into my home directory)
Login using ssh into cloud server
Run the following command to install, verify the installation, and make sure that the installed version is the currently active java, and set the environment for all user respectively
sudo yum install <installer name>.rpm
java -version
sudo alternatives –config java , enter or choose the number of desired java
sudo sh -c “echo export JAVA_HOME=/usr/java/jdk1.8.0_161/jre >> /etc/environment”
source /etc/environment
[myuser@venus-instance-1 ~]$ sudo yum install jdk-8u271-linux-x64.rpm
Loaded plugins: fastestmirror
Examining jdk-8u271-linux-x64.rpm: 2000:jdk1.8-1.8.0_271-fcs.x86_64
Marking jdk-8u271-linux-x64.rpm to be installed
Resolving Dependencies
--> Running transaction check
---> Package jdk1.8.x86_64 2000:1.8.0_271-fcs will be installed
--> Finished Dependency Resolution

Dependencies Resolved

================================================================================
 Package    Arch       Version                   Repository                Size
================================================================================
Installing:
 jdk1.8     x86_64     2000:1.8.0_271-fcs        /jdk-8u271-linux-x64     248 M

Transaction Summary
================================================================================
Install  1 Package

Total size: 248 M
Installed size: 248 M
Is this ok [y/d/N]: y
Downloading packages:
Running transaction check
Running transaction test
Transaction test succeeded
Running transaction
  Installing : 2000:jdk1.8-1.8.0_271-fcs.x86_64                             1/1
Unpacking JAR files...
	tools.jar...
	plugin.jar...
	javaws.jar...
	deploy.jar...
	rt.jar...
	jsse.jar...
	charsets.jar...
	localedata.jar...
  Verifying  : 2000:jdk1.8-1.8.0_271-fcs.x86_64                             1/1

Installed:
  jdk1.8.x86_64 2000:1.8.0_271-fcs

Complete!
[myuser@venus-instance-1 ~]$ java -version
java version "1.8.0_271"
Java(TM) SE Runtime Environment (build 1.8.0_271-b09)
Java HotSpot(TM) 64-Bit Server VM (build 25.271-b09, mixed mode)
[myuser@venus-instance-1 ~]$ sudo alternatives --config java

There is 1 program that provides 'java'.

  Selection    Command
-----------------------------------------------
*+ 1           /usr/java/jdk1.8.0_271-amd64/bin/java

Enter to keep the current selection[+], or type selection number:
PS: I took the simplest step to install oracle java 8, other tutorials can be found here, and here.
After set-up an instance in Google Cloud, I want to map my server to my existing purchased domain. Browsing the steps in GCP user guide feels too complex and I ended up finding this video :
Tutorial by Codedamn
worked like a charm, Thanks a lot Codedamn.
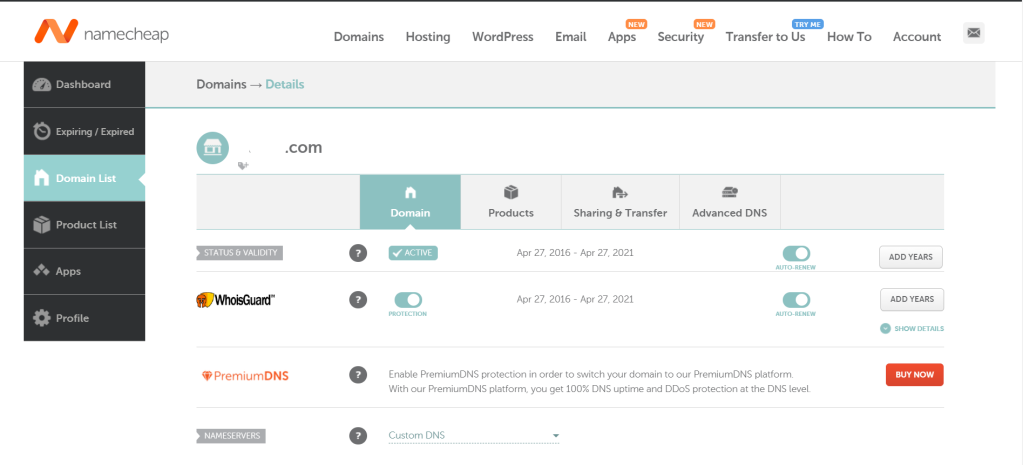
in recap, these are the steps: 1. Make sure you already own a domain, and go to the nameserver setting page( ex: namecheap)
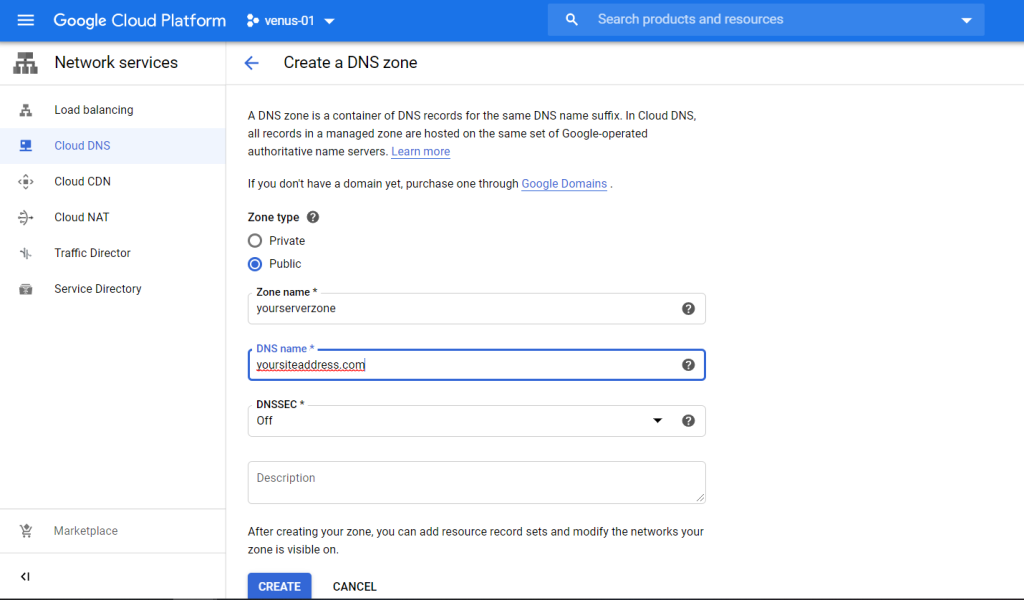
2. Go to GCP console[Networking] > Network Services > Cloud DNS 3. On this page, click CREATE ZONE
4. Fill the details regarding the desired zone (I use the name of my domain), and click CREATE
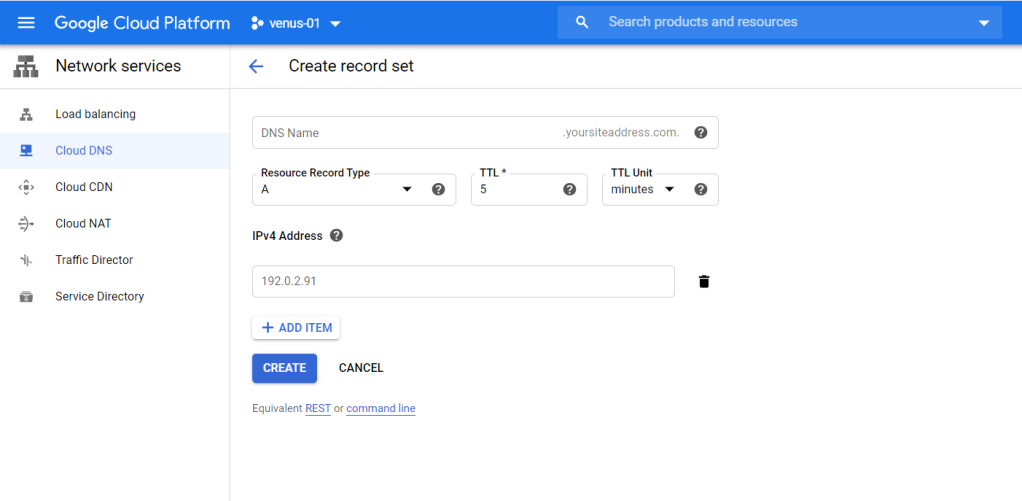
5. We will get redirected to this page, then click ADD RECORD SET
6. In this page, fill the IPv4 address with the public IP of your VM instances, then click CREATE
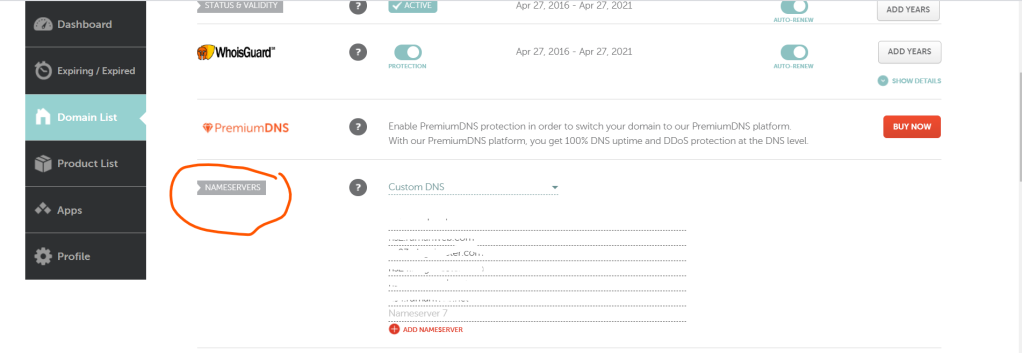
7. Done, we got the information of the nameserver ,
8. Click the REGISTRAR SETUP, on the popup copy and paste the list of nameserver(NS) in the nameserver part of the domain setting
9. Done. it may take few min/hour to get it updated, or you may check it on DNS propagation checker page to make sure your domain is refer to the correct address of your server IP.
I write down this for self reminder just in case I need a guideline to create another one. As Google Cloud Platform now offering 1 year free tier with 300$ credit, so why not ?
After completing the registration for GCP account, I directly go to GCP console to start exploring. There will be checklist for getting started, such as create your first project, etc.
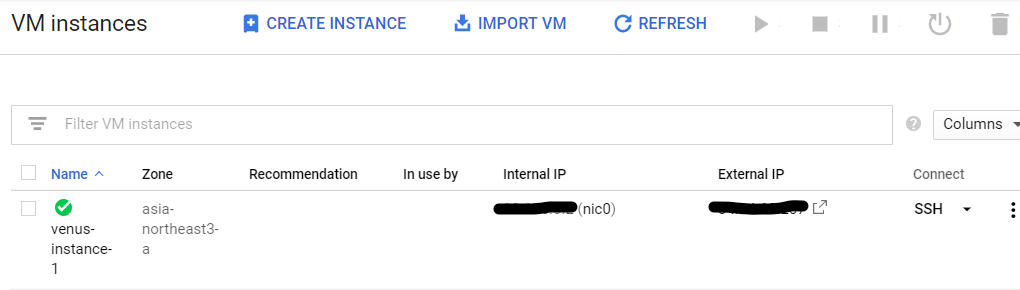
as the basic one, I tried creating new VM instance for my first server, by accessing it from left menu [compute] > compute engine > VM instances, and fill the following details, finally click create :
Name: [INSTANCE-NAME]
Label: – (optional)
Region: asia-northeast3(seoul)
Machine: e2-small (2vCPU, 2GB memory)
Boot Disk: CentOS 7
Identify and API access: compute engine default service account
after clicking create button, I got redirected to this page,
For first access, I tried connect using ssh using native browser, inside the console that I tried setting up the open ssh, and create public key to enable access using puTTy or other ssh client as follows
Installing openssh, starting ssh service, activating the service
To add a public SSH key, click Add item. A text box opens.
Copy and paste the contents of your public SSH key file into the text box.Repeat this process for each public SSH key that you want to add.
To remove a public SSH key, click the removal button next to it:Repeat this process for each public SSH key that you want to remove.
When you have finished editing the SSH keys, click Save.
After it’s added into metadata page, I can access ssh using putty, by choosing the authentication using private key authentication (Connection > SSH > Auth > browse .ppk file)
Actually this is the second project I joined and requires me to revisit my C programming learning (because skill is not in me yet). I decided to do it from the very beginning as I got new workstation to work with .
I got the setup tutorial from Dr Paul Denny and got the Visual Studio Community installed
I tried the steps described in that site, and now I am ready to start my C programming learning journey from these useful sites:
last project I tried creating batch processing by combining C and oracle SQL we call it Pro C. This batch program can read the content from fixed formatted text and do bulk insert directly into table in DB
That time I just followed the guidance from the predefined source, without really understanding the purpose of each line of code
Hopefully this time I can learn C programming comprehensively.
You need to add your PHP installation directory to the %PATH% environment variable, or work from the PHP installation directory.
To add it to path (The best approach – Edited for Windows 7):
Right-click on a My Computer icon
Click Properties
Click Advanced system settings from the left nav
Click Advanced tab
Click Environment Variables button
In the System Variables section, select Path (case-insensitive) and click Edit button
Add a semi-colon (;) to the end of the string, then add the full file system path of your PHP installation (e.g. C:\Program Files\PHP)
Keep clicking OK etc until all dialog boxes have disappeared
Close your command prompt and open it again
Sorted
Alternatively, you can run cd <PHP installation path> before you try and run you command, or call your script like <FULL file system path of php.exe> <path to script>


 Repeat this process for each public SSH key that you want to remove.